I’ve reviewed several leverless arcade controllers for the Switch / Switch 2, but I’ve had my eye on the Hit Box Ultra for a little while now. For those unfamiliar, Hit Box is the original leverless arcade controller; if you want to contest that, then it’s at least the one that popularised the concept. The Ultra is the company’s latest iteration of its core design, adding in three of its remarkable ‘C.O.M.B.O. Extension’ buttons while making some thoughtful improvements to the overall design.
Right off the bat, the Hit Box Ultra has native compatibility with the Switch, Switch 2, PS4, PS5, and PC – there’s no Xbox support for this one. Being able to connect to the PS5, however, is a huge win since the vast majority of arcade controllers require an additional authenticator to work properly.
All you need to do is hold the relevant button while plugging in the device to link it to your chosen console (check the manual for the exact button). Alternatively, holding in the small menu button on the far right allows the Ultra to automatically recognise which console you’re using. Similarly, you’ve got multiple SOCD modes available, and you can even swap the directional input to mimic the d-pad, left stick, or right stick.
In terms of design, the Ultra is much slimmer and lighter than its predecessor, coming in at 27mm in height and 1.7 kg / 3.75 lbs in weight. The main body is built from steel, so it’s incredibly durable and feels very premium, which you’d expect at a price point of $299.99 / £226. You might notice that, in terms of height, it’s still a lot thicker than other arcade controllers I’ve looked at, and that’s because of the buttons the Ultra houses in its main body.
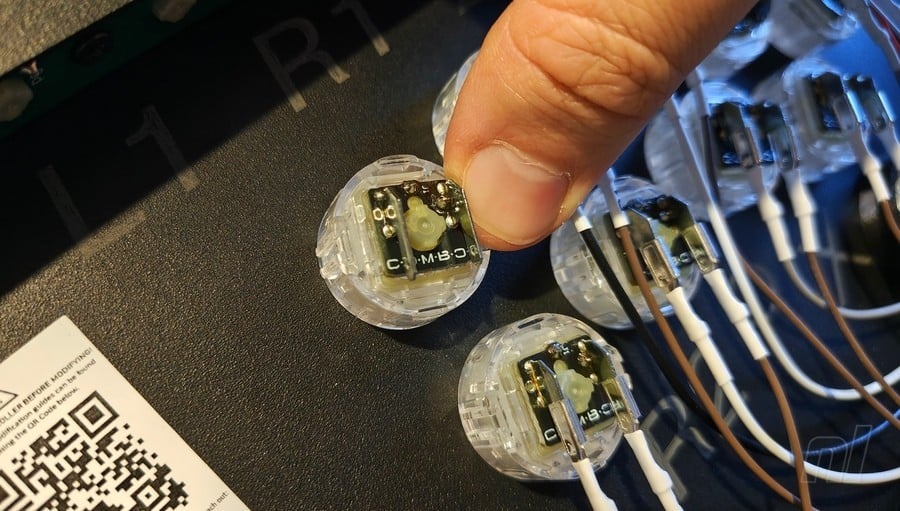
Usually with arcade controllers, they’re loaded with Kailh switches that are then covered with a simple key cap. Not so with the Hit Box. Here, the C.O.M.B.O. buttons are made up of several components: the well (which houses Cherry MX low-profile switches), plunger, optimiser, cap, and finally, the locking ring. So essentially, the well slots into the controller’s main body, the optimiser rests snugly inside, the plunger (with the key cap attached) sits on top, and the ring locks everything in place.
As standard, the Ultra comes with three sets of optimisers. These are silicone cushions that sit within the button well and provide two key functions: they lower the travel distance of your button presses while almost completely silencing them. Twelve Super (1mm) optimisers are pre-installed, while you’re also provided with twelve Classic (1.5mm) and Ultra (0.65) optimisers each, so I encourage you to experiment and see which one fits your play style.
Switching them out is easy: you just hold down on the button you’re customising, turn the locking ring anti-clockwise, pull it out, lift the plunger up, then scoop the optimiser out and replace it with a different one. Alternatively, you can just leave them out completely if you want a more ‘classic’ arcade feel to your buttons, but just keep in mind that they’ll sound louder when pressed.

When you first unbox the Ultra and start testing out the buttons, they might feel a bit weird; ever-so-slightly spongy, in fact. However, when I started unleashing a bunch of combos in Street Fighter 6, any reservations I had completely melted away.
The speed at which you can actuate the button inputs is simply unrivalled, and I’ve found that the Ultra almost immediately improved my overall performance in game. Swapping out the Super optimisers for the lower-profile Ultra optimisers helped even more. Ultimately, a pattern you’ll come to notice in this review is that the Ultra consistently offers up options. I love the optimisers, but as mentioned earlier, you don’t have to use them if you don’t want to.
And then we come to the C.O.M.B.O. Extensions. You get three with the Ultra, and they’re essentially two buttons in one. You’ve got the standard C.O.M.B.O. button I’ve already gone through, but then an extra button that houses a Kailh PG1425 X microswitch. Lots of arcade controllers these days come with additional inputs embedded in the controller itself, but the good thing about the Extensions is you can rotate them to a specific position, or even customise the layout completely by swapping it with another button.
The three pre-installed Extensions are situated in the middle of the button layout; sort of sitting vertically in a line. This is a nice layout as it is, but I really like having a button over on the far left on which to rest my pinky finger, even if I don’t actually have any inputs mapped to it. It just feels right to me.
Whatever layout you choose, the Extensions are mapped to ‘L3’, ‘R3’, and ‘Capture’ by default (note: the Capture input is mapped to ‘Touchpad’ if you’re using the Ultra on PS4/5). You can swap the inputs to whatever you wish, however, and we’ll get into how in a bit. Just be mindful with something like Street Fighter 6, most tournaments won’t let you map the same input to 2 separate buttons.
Again, the ability to rotate your Extensions or swap them with another button is all about making the most of the copious options that the Ultra presents. You just can’t do this with other controllers, and it allows you to really make it your own. You know the saying: “This is my arcade controller. There are many like it, but this one is mine”.
Okay, maybe not…
Up on the top of the device, you have 6 menu buttons: from right to left, these are +, Capture, Home, –, R3, and L3. Over on the far left is the power port, which sits almost completely flush with the device. You get a braided cable with the Ultra, and it feels incredibly rugged while the proprietary design keeps it locked in place when attached. My only concern here is if the cable does wind up dying at some point, sourcing a replacement won’t be as easy as finding a standard USB-C cable (though Hit Box does sell replacements on its official website). Over on the back, you’ve got a non-slip plate to keep the controller from sliding everywhere while in use, and it’s actually magnetic by design – this is where the real fun begins.
Removing the magnetic plate lets you get into all the hardware and wiring inside, and this is what you’ll need to access if you want to customise the layout of your Ultra and swap out the Extension inputs. Don’t worry if this looks daunting from the images, it’s actually not as complex as you might think.
So let’s say you want to remap your Extensions. You’ll see a small, green switchboard on the bottom right with three pins poking out. You just need to unplug the pin you want to remap and plug it into the desired input. Keep in mind here that the labelling is for PlayStation, but so long as you consult your manual and Hit Box’s online guides, you’ll be able to instantly translate the PlayStation inputs to Switch inputs.
Swapping the layout is a bit more complex, but again, it’s not too taxing. You just need to disconnect the two wires from the button you wish to remove by pulling them out with your fingers; no tools required, but you can use pliers if you wish. Once they’re out, just push the button through from the back, and it’ll pop out the front.
If you’re removing an Extension button, you’ll also need to disconnect the thin, white signal wire from the terminal block on the top right. All the wires are kept neatly together with three velcro strips by default, so you might need to remove one or two of these to free up some of the wiring for customisation.
If you’re looking to customise the layout of your Ultra, I firmly recommend finding the ideal setup for you and then sticking with it. Removing buttons and swapping them around isn’t hard, but you don’t want to be fiddling around with the wiring every other day – and it actually comes with six small screws to completely lock the magnetic back plate in place once you’re confident you’re done with any tinkering.
Ultimately, this isn’t beginner-friendly, so if you’re completely new to the world of leverless controllers, this probably isn’t the controller you want to start with. I can’t necessarily knock it for that, though, since Hit Box doesn’t – in any way, shape, or form – market the Ultra to beginners. This is a product for those looking for a long-term investment to take to tournaments and really step up your fighting game in the professional space.
Although I wasn’t able to do this for the review, Hit Box does confirm that you can mod the Ultra further with custom artwork. You’ll need to purchase a separate, clear acrylic top for the device and remove all buttons to accomplish this, but it’s an option for those desperate to express themselves even more. Thankfully, adding artwork to the buttons is easy, since you just remove the transparent caps and add your circular artwork underneath. Speaking of the acrylic top, I suspect this thing will be a magnet for scratches over time; it’s already attracted a bunch of fingerprints, so keep the cleaning cloth at hand at all times. Definitely a bit of a disappointment there.
Finally, you get a few extra goodies with your Ultra. First up are three Extension shields which protect the C.O.M.B.O. Extension buttons when travelling – you just slide them onto the end when you want to use them. To keep the Extensions locked in place if you’ve found the perfect rotation angle, you can add Grapplers underneath to stabilise them. These aren’t essential and you’ll probably find the Extensions are pretty stable anyway, but it’s good to have.
And last but not least, Hit Box has included a black, branded carry bag to transport your Ultra out and about; a lovely little extra that will come in handy if you attend tournaments frequently.
Conclusion
While the Hit Box Ultra isn’t cheap, perhaps more than any other arcade controller I’ve tested recently, it’s very much a long-term investment geared toward players who compete professionally. The level of button customisation is unparalleled, the steel body is weighty and durable, and native compatibility with Switch, Switch 2, and the PS5 makes it one of the best options out there if you’re looking to take your game to the next level.
Replacing the proprietary cable if anything goes wrong does concern me a bit, but like the controller itself, it’s so strong and durable that I don’t expect it to break on me anytime soon. If you like keeping your controllers in pristine condition, the acrylic top may cause issues attracting fingerprints and potential scratches. Otherwise, this is a truly world class controller for fighting games.
Thanks to Hit Box for providing the sample used in this review.
